How Do I Change the Company Information on the Platform?
This article walks you through how to change and update the company information on the platform, such as the company name, logo and more.
For Platform Administrators:
This article is intended for Bucketlist platform administrators. If you are an employee or end-user, some features or settings described here may not be available to you.
Quick Links:
How To Change and Update Company Information
This is the first of three articles that explain the settings in Bucketlist where the company admins of the platform can make changes to the company information, point configuration and other miscellaneous settings.
How To Change and Update Company Information
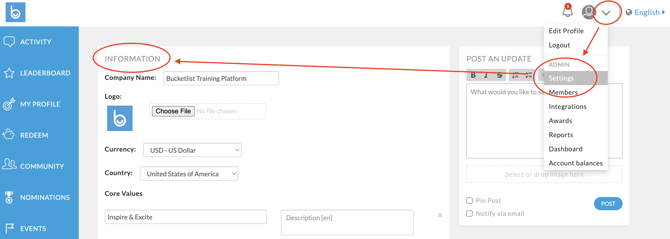
- Select the drop-down menu in the top right corner
- Select Settings
- On this page, you will first see your company-specific information and platform design. Below is a deep dive into each section and how to customize
- Once you have edited/updated the information, make sure to scroll to the bottom and select Save Changes
Visual steps of how to access the Setting tab:

How To Update Company Information and Settings:
- Company name and Logo. You can have your platform named as your company name or this can be changed to your program name if you want to name the program something more aligned with your reward and recognition program.
Logo. Your logo appears on the top of the platform. You can upload your company logo or a custom logo that is related to your reward and recognition program. Please make sure this logo is a jpeg and is not transparent to ensure your logo appears correctly on email notifications. To change your logo, simply select Choose File and upload from your device.

- Currency and Country. This relates to what currency and country your platform's Redeem section is listed in. For currency, you can choose from US dollar, Canadian dollar or Euro
Country. This is the main country of your country. This sets the default country of your employees but employees are able to adjust their country through their individual Edit Profile section
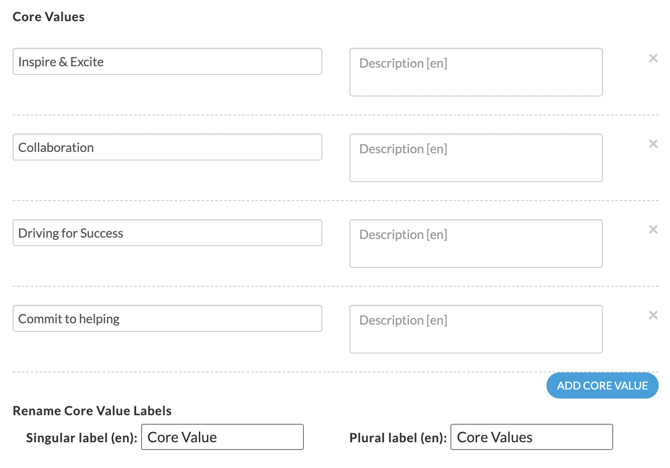
- Core Values. You will add your core value(s) to this section by adding the name and optionally, adding in a description of the core value.
If you need to add additional core values, you can add more boxes by pressing the Add Core Values button near the bottom of the core value section. Also, you can remove core values by selecting the X to the right of the core value you wish to remove.
Core values are mandatory as users will select at least one when they post a recognition. This is a great way to see which core values people are exhibiting the most and which ones may need a bit more attention.
The great thing about core values is they are completely customizable to your company and reward and recognition program. Don't have company core values? No worries. How about coming up with some guiding principles you wish for people to exhibit through their work?
Lastly, you have the ability to rename the core value labels to something that better fits your company and program. To do this, input the singular and plural labels into their respective boxes.

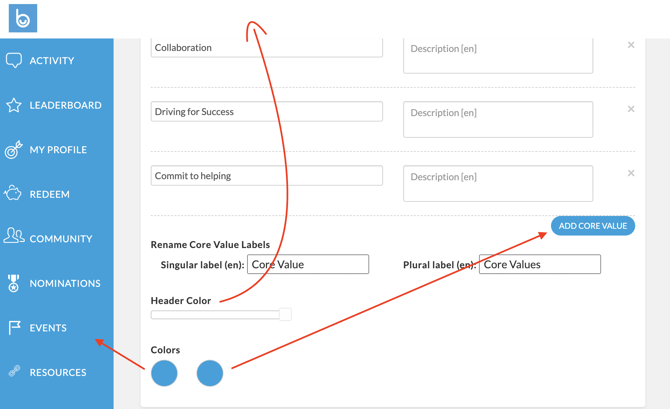
- Header Color and Colors. The Header Color represents the top bar color of the platform. This is a sliding scale of white to black. The most common color is white so the logo can really shine.
Colors. You also have the ability to change the platform colors using the color wheel. The left color wheel represents the color on the left navigation panel. The right color wheel represents the color behind buttons. You're able to put in a hex code or play around with the color wheel. We recommend using darker colors to ensure the text is visible for users.

** Once completed ** scroll to the bottom and select the Save Changes button to save your changes

Video explanation:
-4.png?width=300&height=97&name=bucketlist-full-logo%20(2)-4.png)