-4.png?width=300&height=97&name=bucketlist-full-logo%20(2)-4.png)
For Platform Administrators:
This article is intended for Bucketlist platform administrators. If you are an employee or end-user, some features or settings described here may not be available to you.
The following steps explain how to create an account and and API key for the BambooHR integration in Bucketlist Rewards.
Security Note
As a security point of view, it's important to manually specify only the fields that Bucketlist Rewards needs access to (as described above) VS allowing 'everything' as this could would create an API key having access to all your employees data (like SSN, etc) when it's not needed. Remember that anyone with the API key could have access to all the fields that you give the rights to.
Create the Access Level
1. Login into BambooHR with an administrative account.
2. In BambooHR:
- Click on 'Settings', 'Access Levels', click on the '+' icon and then on 'Custom Access Level'
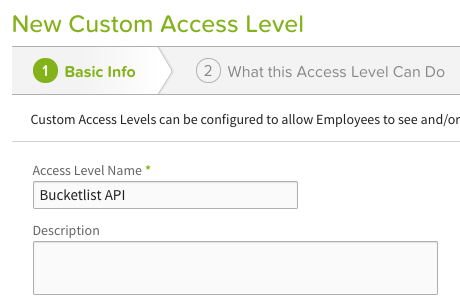
3. For 'Access Level Name', type 'Bucketlist API' and click on 'Next step'
4. In the step 'What Can People with this Access Level Do?', don't check anything and click on 'Next Step'
5.In the next step, select these fields for 'view only' access:
- In 'Personal' > 'Basic Info', select
- Employee #
This is needed to keep the synchronization between the users of BucketlistRewards and the BambooHR integration. - First Name
- Last Name
- Preferred Name
This field will be used as the first name if it's not empty - Birth Date
this field is optional, you can keep it as 'no access' if you don't wish to have birthdays of your employees imported into your platform
- Employee #
- In 'Personal' > 'Address', select
- Country
- In 'Personal' > 'Contact', select
- Work email
The employee's email are used to login to the platform and receive notifications from the platform (for example, when they receive recognitions, etc). Note that employees can unsubscribe from notifications if they do not wish to receive them anymore.
- Work email
- In 'Job' select
- Hire Date
This field is optional. This will be used as the employee's start date and may be used for automating service awards, like giving a rewards for employees after being with a company for a specific amount of years.
Note: If preferred, the field 'Original Hire Date' can be used instead of 'Hire Date'. Note that, in this case, both fields ('Hire date' and 'Original Hire Date') should be shared as 'view' - by default, employees in BambooHR will only have their 'Hire Date' filled up and might not have an 'Original Hire Date' value. If the 'Original Hire Date' is empty, the employee's 'Hire Date' field will be used instead.
- Hire Date
- In 'Job' > 'Employment Status' select
- Employment Status
This is needed to know the difference between an active or terminated employee. If they are terminated, they will be removed from the platform.
- Employment Status
- In 'Job' > 'Job Information', select
- Reporting To
This is used to set the users' access permissions in BucketlistRewards. People that are managers will have the 'manager' permission and others will get the 'employee' permissions.
- Reporting To
- In 'Job', select
- Direct Reports
This is used to generate reports using the API. For example, to get all terminated and active users.
- Direct Reports
6. Click on 'save and finish'.
Create the Account that Will Have Access to the API
This step is required as this will create a user that will be tied to the right access level from which we'll get the API key from.
1. In the 'Employees' tab, click on 'Add new employee'
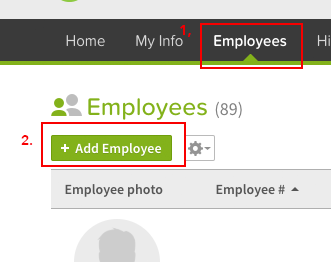
2. Since it's an employee that will be used only to access the API, fill up only the required fields (First and last name). You can call the employee 'Bucketlist API' for example.
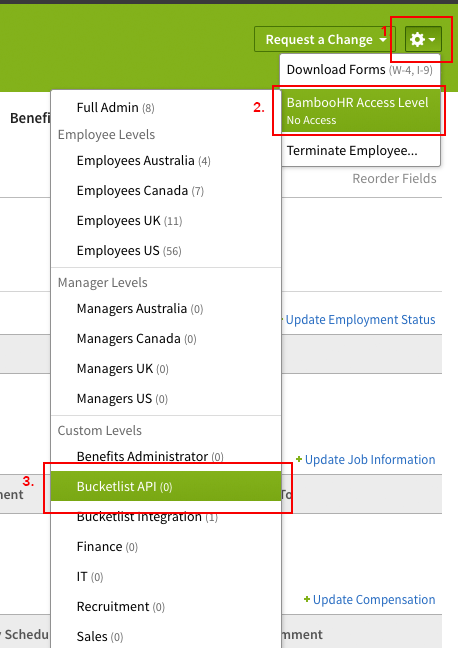
3. Once the employee is added, from its detail page, click on the 'cog icon', 'BambooHR Access Level' and choose the access level added in the previous steps (Bucketlist API).
4. BambooHR should then ask you to enter an email. Enter an email for which you have an access too. This is because BambooHR will send a link to set the user's password.
6.Check the email account that you used in the previous step. You should've received a similar email as this one:
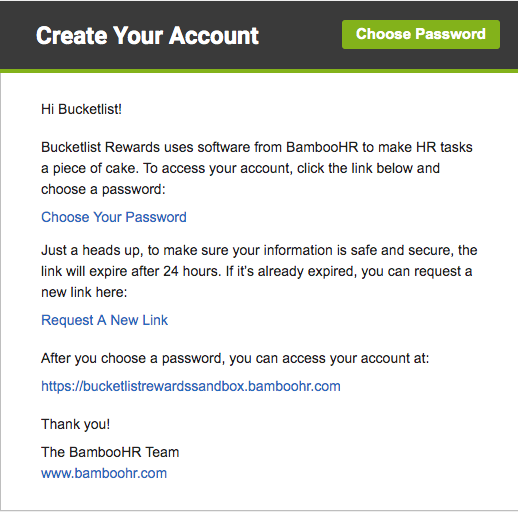
7. Click on the 'Choose your password' link and enter the user's password.
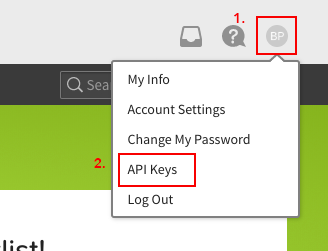
8. Once logged in, click on the user's icon (the top right round icon) and 'API Keys'
9. In the 'My Api Keys' page, click on 'Add New Key'.
10. Enter 'Bucketlist API' in the 'API key name' input field
11. Click on 'Generate Key'
12. Copy the generated API key to somewhere safe. It should look like a random string of 40 characters/numbers.
Share the API Key of your BambooHR integration with Bucketlist Rewards
1. Your Bucketlist implementation specialist or account manager will provide you with a secure link to upload your API key information and your company subdomain
2. Once received, Bucketlist will do the set up on our end.
3. Once Bucketlist set ups the integration, click on your icon (top right corner) and on 'integrations'. Here you'll see your BambooHR API key and your BambooHR platform URL.

Note: If you don't see that section in your integrations page, please contact support
Check the Members section (top right drop down menu)
1. Click on your avatar and then on 'Members'.

2. In the right side (on Desktop), you should see a 'BambooHR' panel like so:

- Checking the 'Auto-Invite new employees' will automatically invite the new employees in BambooHR that aren't in Bucketlist Rewards every 24 hours.
- Checking the 'Auto-Remove terminated employees' will automatically remove employees in Bucketlist Rewards too.
- If you click on 'Invite all employees' button, you will be asked to invite all employees in your BambooHR integration that aren't yet in Bucketlist Rewards.
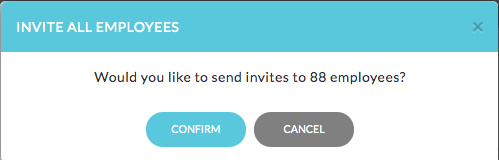
- If you confirm, then all employees that aren't in Bucketlist Rewards yet will be invited to the platform by Email using a temporary password or an SSO connection, depending on your companies' settings.
- Note that this could take a couple of minutes, depending on the number of users that are invited, before all users are invited and email sent.
- Clicking on 'synchronize managers' will change users' permissions.
- If a user is a manager in BambooHR (that is, if the user is set as the manager of at least 1 employee), their permission access will be 'managers'
- Otherwise, users will have the permission 'employee'.
- Admins, for a security reason, aren't synchronized automatically, they need to be set manually in the BucketlistRewards platform. When synchronizing 'managers', 'admin' users are ignored, meaning that they keep their access rights and are not 'downgraded' nor set to other permissions.
Note on Automated User Synchronization
- Synchronization happens every 24 hours
- User's dates (birthdays, etc) are synchronized independently from new hires, so it's possible that new hires won't have birthdays added right away.