-4.png?width=300&height=97&name=bucketlist-full-logo%20(2)-4.png)
For Platform Administrators:
This article is intended for Bucketlist platform administrators. If you are an employee or end-user, some features or settings described here may not be available to you.
*NOTE: If you had the previous version of the MS Teams integration before the updates, to refresh your integration you simply need to install the new version over your existing one. This should update everything seamlessly for you.
**NOTE: This setup can not be completed through an admin portal for MS Teams, it needs to be completed through the MS Teams application itself.
The Bucketlist MS Teams integration is a tab that is added to an MS Teams channel.
See the diagram below to see where channels and tabs are in MS Teams.
How to Set Up Microsoft Teams:
1. Adding the Bucketlist App from MS Teams Apps Page
a. Open MS Teams and click the "Apps" icon on the left sidebar, and search for “Bucketlist".
![]()

b. Click on the app listing card. This will display a modal/pop-up window with more information on the Bucketlist app. Click the "Add" button in the modal/pop-up window.

2. Choosing a Channel
a. To begin, decide which channel you would like to install the tab into. It could be a new channel, or a channel that your users already use regularly.
Note: Bucketlist notifications will come into the Posts tab of the channel, and the Bucketlist app will go into a new tab of the channel.

b. After clicking "Add" on the app page, it will navigate to a new screen in the modal/pop-up window to add a team/channel to add the app to. Choose the channel you wish to add Bucketlist to. Click "go".

Adding a Tab & Connecting your Bucketlist Site
When you click "go" on the above, this will add the default name of the Bucketlist ("Bucketlist") app to Teams -> "Tab Name" -> "Bucketlist".
The server will now be configured and saved for every MS Teams user in that team. The settings configuration modal/pop-up window will close and the admin is now shown the login screen in the tab.
You can now log in using your Bucketlist credentials to see your Bucketlist activity feed in MS Teams.
Congratulations!
You have already done the most important part and connected your site to your MS Teams app. The following steps are necessary to have MS Teams notify your users when there are updates to the Bucketlist activity feed.
If you choose to use the app without notifications, or wish to add notifications later, skip down to the “Logging into Bucketlist” section below to begin using your app.
Setting Up Notifications
The following steps are used to set up notifications from Bucketlist to MS Teams.
To set this up, you will need to create a “webhook workflow”, which creates an MS Teams workflow which your Bucketlist site can send messages to.
The webhook workflow contains 3 parts:
- MS Teams Tab URL - The Bucketlist tab url.
- MS Teams Workflows URL - The MS Teams side of webhooks.
- Copy Bucketlist webhook - The Bucketlist side of webhooks.
Note that this is the most complex part of the setup. Feel free to ask Bucketlist support to assist you if you need help.
Get the MS Teams Tab URL
You need to tell the workflow the address of the tab you just set up, so that the notifications can be clicked and open up the correct MS Teams tab.
This url is the Bucketlist app tab url that was just added to the MS Teams Channel. The url is used to help the “Go to Bucketlist Tab” button in the MS Teams Channel -> Posts. This is an example:

a. To find this url, go to the Bucketlist tab from within the channel, click the dropdown menu on the tab name. Click “Copy link to tab”. This will copy this URL to the clipboard.

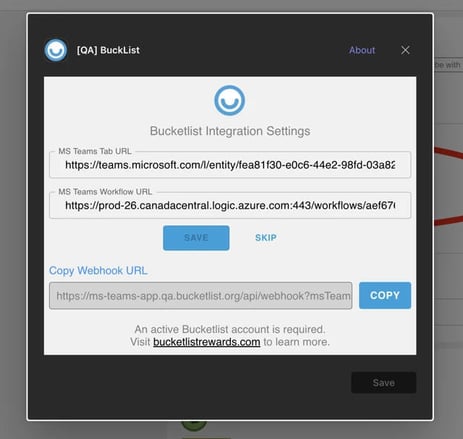
b. Next click the same Bucketlist tab dropdown menu and select Settings to bring up the Admin Settings modal/pop-up window.

c. Paste that copied url into the "MS Teams Tab URL" input. Click Save in the center of the page, and the second save on the bottom.

Create a MS Teams Workflow
a. To create a new Workflow, go to MS Teams -> Teams -> "Bucketlist Demo" (channel). On the top right there is a horizontal ellipsis dropdown. Click this and select Workflows.


b. The Workflows modal/pop-up window will appear, under "notify to a team" section please select "Send webhook alerts to a channel".
c. This will go to an MS Teams account selector screen within the modal/pop-up window. Switch to the appropriate MS Teams account or do nothing and click Next.

d. This will go to a Team and Channel selector on where the AdaptiveCard post should be sent to. Then Click "Add Workflow".

e. Next view is a success view within the modal/pop-up window, where they can copy the workflow URL. Copy the URL by clicking the pages button at the right-most of the URL. Click Done.

Note: If the admin needs to get this again, they can click into the ellipsis button on the left menu of Teams, and then click on "Workflows" (or from the team channel, the ellipsis- workflows as prior in step a above), and then on the ellipsis button for that newly created Workflow, and click Edit.

There will be a Workflow builder with components, click the first one to expand it, and click the copy button to copy the HTTP POST URL.

-----
f. Now with that url copied, go back to the Bucketlist app tab, click the dropdown and go to Settings.

g. This will bring up the initial Admin Settings view, paste that url into the MS Teams Workflow URL input. Click Save in the center and save at the bottom of the modal.
Get the Bucketlist Webhook URL
This webhook url has some pre-filled parameters that are required on the Bucketlist Integrations side (not in MS Teams).
To get this if you had closed out of the modal- Navigate back to the Admin Settings modal/pop-up window by clicking the Bucketlist tab dropdown again.
a. At the bottom of the modal/ pop-up window is a pre-filled input that is greyed out of "Copy Webhook URL". Click the copy button to copy the url.

b. Navigate outside MS Teams, to your platform Bucketlist -> Integrations from the admin menu in your browser.
c. Within the Webhooks section, paste the url in the "URL for recognition" and type "msteams" in the top area secret field, and then click the "add integration" button.

Testing the Webhook
Within Bucketlist -> Integrations, the admin can now click the "Test Integration" button to send a webhook (containing the last Bucketlist recognition activity).
To view a successful webhook, navigate back to MS Teams -> Teams -> "Bucketlist Demo" (channel) -> Posts. There should be a new activity in Posts containing some information with a Bucketlist recognition and a button to navigate to the tab.

Note: “Jody Chambers via Workflows” is not customizable and displays the user’s name who created the MS Teams Workflow.
Another indicator of a successful webhook, make sure while not on the "Bucketlist Demo" channel itself (ex: go to Chat on the sidebar), and do that same Test Integration from Bucketlist -> Integrations. Navigate back to Teams -> "Bucketlist Demo" (channel), the "Bucketlist Demo" channel name should now be bold, indicating new activity in the Posts tab.

Turning off notifications
If notifications need to be disabled there are various areas to do that:
1 - Bucketlist activity still posting to the Posts tab, but no notifications popping up from mobile or desktop app.
Within the MS Teams Channel, navigate to the ellipsis in the top right corner, and select Notifications. A modal/pop-up window will appear:

Select the type of notification settings for the entire channel.
Note: This will change the notification settings for all types of messages / posts in the channel, not just the Bucketlist activities.
2 - Bucketlist activity still posting to the Posts tab, but no notifications popping up from mobile or desktop app (from Bucketlist only).
There is no way to differentiate between regular MS Teams posts and Bucketlist activities that come into the Posts tab, so there is no way for the Bucketlist activities to show but not trigger a notification in the MS Teams mobile / desktop app. Bucketlist webhook activities will have to be blocked from entering the Posts tab.
3 - Bucketlist activity not posting to the Posts tab (disabling from MS Teams Workflows)
Turning off Bucketlist activities from posting to Posts tab can be done by toggling the MS Teams Workflow created for this app. This is the easiest method to revert if needed.
Navigate to the Workflows manager from the very left sidebar (Workflows) or the ellipsis in the top right corner of the channel.

Next click Manage.

Next click the Status toggle to off.
4 - Bucketlist activity not posting to the Posts tab (disabling from Bucketlist Integrations)
If you want to change your webhooks from going to MS Teams, to somewhere else, this method will keep the settings in the MS Teams app intact for switching the webhooks back.
Navigate to https://<company-slug>.bucketlist.org/admin/integrations/ and click Remove Integration (or change the URL)

5 - Bucketlist activity not posting to the Posts tab (disabling from Bucketlist app in MS Teams)
This method should be used if you know you do not want Bucketlist activities for the foreseeable future showing in the Posts tab of MS Teams.
Navigate to the Admin Settings page of the Bucketlist app tab in MS Teams.

Within the Admin Settings modal, remove the MS Teams Workflow URL and MS Teams Tab URL
Click Save and the MS Teams Save button.
Logging into Bucketlist
Once the app has been configured by an admin, your MS Teams users will see the new tab in the channel and can start using the Bucketlist app.
Your users don’t have to go through these steps - you did the hard part for them!
However, each user will still need to log in to Bucketlist in the MS Teams app.
Every time a user navigates to MS Teams -> Teams -> "Bucketlist Demo" (channel) -> Bucketlist, they will now see the login page.

To login, users will need to enter the subdomain of the URL for Bucketlist (normally the same as your company name, but the URL prior to .bucketlist.org or .bucketlistrewards.ca; eg. wonka.bucketlist.org subdomain is wonka). They can then login through the normal login method. Once the login is complete, the user will now be logged in on every platform of MS Teams (Web browser, Mobile and Desktop). MS Teams will remember the logged in user for some time.
To learn more about the features of the MS Teams app, please visit MS Teams User Guide and FAQs