-4.png?width=300&height=97&name=bucketlist-full-logo%20(2)-4.png)
For Platform Administrators:
This article is intended for Bucketlist platform administrators. If you are an employee or end-user, some features or settings described here may not be available to you.
Article Contents
- Step-by-Step integration Setup Instructions
- Go-Live checklist
- Field mapping outline
- Troubleshooting
Step-by-Step Integration Setup Instructions
Step 1: Create a role in Dayforce to ensure the API’s service account that we will create in follow up steps have only the necessary permissions to read what is needed by the integration.
- Login in Dayforce with a user that can edit and create roles
- Navigate to the ‘System Admin > Roles’ section

- Click on the ‘Add’ button and fill the mandatory fields and the description field (optional)

- In the Name field, enter the role’s name, for example “Bucketlist Rewards API Access”
- In the Description, you can enter something descriptive for the service account.
- In Password Policy, choose the password policy or create a password policy per your password standards.
- In Reference Code, enter a reference code. For example: role-bucketlist-api
- Click on the Save button

-
Still on the role selected, open the “Authorization” tab

-
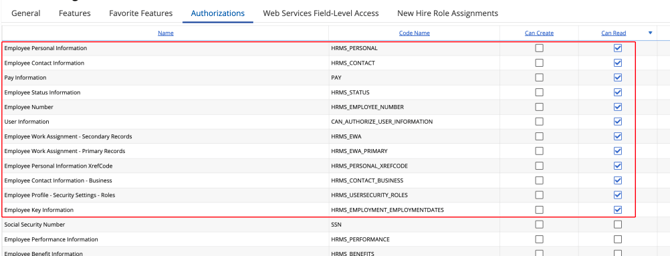
Check the “Can Read” checkbox for all the following rows:
-
Employee Contact Information
-
Employee Contact Information – Business
-
Employee Key Information
-
Employee Number
-
Employee Personal Information
-
Employee Personal Information XrefCode
-
Employee Profile – Security Settings – Roles
-
Employee Status Information
-
Employee Work Assignment
-
Employee Work Assignment – Secondary Records
-
Forms – Employee Status Information
-
Pay Information
-
User Information
-
-
Click on the “Web Services Field-Level Access” tab

-
Expand “RESTful Services > Human Resources > Employee”

-
Check the following checkboxes under Address:

-
Addresses > ContactInformationType ContactInformationTypeGroup > XRefCode
- Addresses > ContactInformationType > XRefCode
-
-
Check “Addresses > Country > XRefCode” under Addresses

-
Check “Birthdate”

-
Note: This is optional and needed only if we want to configure Birthday Awards. The date will be sent to Bucketlist Rewards in the format year-month – the “day” is not sent to Bucketlist Rewards.
-
-
Check the following checkboxes under Contacts
-
Contacts > ContactInformationType > ContactInformationTypeGroup > XRefCode
-
Contacts > ContactInformationType > XRefCode
-
Contacts > EffectiveEnd
-
Contacts > EffectiveStart
-
Contacts > ElectronicAddress
-
-

-
-
-
Check the “ManagerXRefCode” checkboxe under EmployeeManagers

-
Check “EmployeeNumber”:

-
Check the following checkboxes under “EmploymentStatuses”

-
EmploymentStatus > LongName
-
EmploymentStatus > ShortName
-
EmploymentStatus > XRefCode
-
-
Check “First Name”

-
Check “Last Name”

-
Check the following checkboxes under “Roles”

- IsDefault
-
Role > ShortName
-
Check StartDate

-
Check the following checkboxes under “WorkAssignments”

-
Location > LegalEntity > Country
-
Location > LegalEntity > ShortName
-
-
Check the following checkboxes under “WorkAssignments”

-
Position > Department > ShortName
-
Position > ShortName
-
-
Check “XRefCode”

-
-
Click on the “Save” button

-
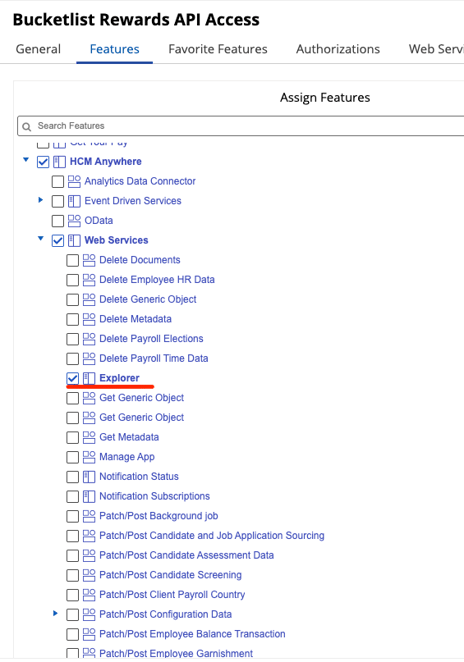
4. Give the user role 'Bucketlist Rewards API Access' authorization to use the HCM Anywhere > Web Services feature.
-
Go to System Admin → Roles
-
Open the role Bucketlist Rewards API Access
-
Go to the Features tab
-
Find HCM Anywhere → Web Services and enable it
-
Save the role

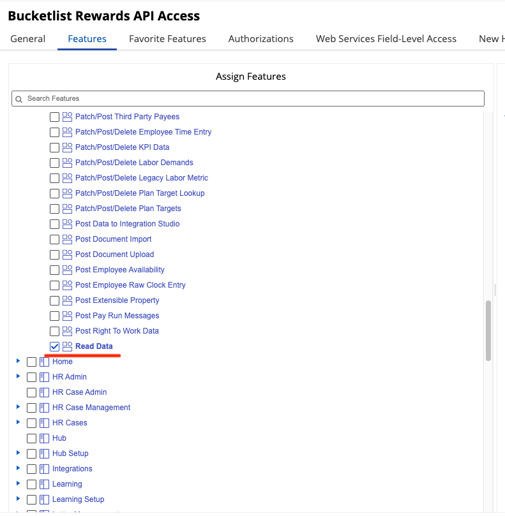
5. Enable the Read Date sub-feature
-
Go to System Admin → Roles → Bucketlist Rewards API Access → Features
-
Expand HCM Anywhere → Web Services
- Enable the Explorer sub-feature
-
Enable the Read Data sub-feature
-
Save
Step 2: Service Account Creation- Once the role is added and configured, you can create the “employee” account that will serve as the service account that BucketlistRewards will need to access Dayforce’s API.
-
In the left navigation menu, click on System Admin > User

-
Click on the “New” button

-
In the bottom form, fill up these fields:
-
User Name: Give a name to the user, like “bucketlist_integration“ or something similar. This will need to be provided to your Bucketlist Rewards contact.
-
Culture: This isn’t relevant to Bucketlist Rewards integration, but this is a mandatory field, so please choose a culture like English (US) etc
-
Click on the “arrow icon” besides the “password” field to generate a new password

-
Click on the “eye icon” to view the password – This will need to be provided to your Bucketlist Rewards contact.

-
Click on the “Add User Role” button

-
Select the role that was created in the previous section

-
Leave the default options for “is Default” checked

-
Set the effective start date of the role to be in the past, for example “1/1/1950”

-
-
You will need to add a location.
-
Click on the “Location Access” tab

-
Click on the “Add Location” button

-
Click on the in the new row, and select the highest level of the organization and click on “OK”

-
Set the location’s effective start to be in the past and the same as the effective start on the role. (e.g. “1950-01-01”)

-
-
Click on the Save button to save the new user

-
Step 4: Share Service Account Credentials
You need to share the following information with your Bucketlist Rewards contact, in a secure manner using ShareFile. They will setup the integration for you on Bucketlist Rewards’ side once this information has been shared.
Please share the following information with your Bucketlist Rep through a secure link:
- CompanyID (ID you use to sign into Dayforce)
- Dayforce namespace (used in API URL)- Eg. "bucketlist" would be the namespace for this URL- https://bucketlist.dayforcehcm.com/MyDayforce/MyDayforce.aspx
- Dayforce API username
- Dayforce API password
- Confirm it is your Production environment

Once configured the integration runs a daily sync between Dayforce and Bucketlist Rewards. This means changes will not appear immediately — it can take up to 24 hours for any user-related changes to be reflected.

Field Mapping
| Bucketlist Field | Dayforce Field |
| First Name | Personal > Contact Information > First name |
| Last Name | Personal > Contact Information > Last name |
| Business Email | |
| EmployeeID | XRefCode |
| Hire Date (Optional) | Employment > Employment Settings > Key Information > First Date Worked |
| Birthdate (Optional) | Personal > Confidential Information > Birth Date |
| Groups (Optional) |
|
| Country | Personal > Contact Information > Country field of the primary Address |
| ManagerID | Go to the employee’s manager > In Work > Management Assignment add the employee |
Troubleshooting
⚠️ Issue: User Data Not Syncing
Description: You may notice one or more of the following problems:
- New users added in Dayforce are not appearing in Bucketlist
- Users removed from Dayforce are still showing as active
- Updates to user information (name, email, department, etc.) are not appearing
Why This Happens: The integration runs a daily sync between Dayforce and Bucketlist Rewards. This means changes will not appear immediately — it can take up to 24 hours for any user-related changes to be reflected.
Steps to Remedy
- Make the necessary user changes in Dayforce (add, remove, or update user info).
- Wait 24 hours for the daily sync to run.
- After 24 hours, refresh your user list in Bucketlist Rewards to check if the changes have appeared.
- If the changes are still not showing, contact your Customer Success Manager or email support@bucketlistrewards.com.